
OpenVPN Tunnel Guide
This section details how to create a tunnel between networks. For that purpose, a server, client and vpn user will be configured on the PfSense GUI. This setup utilizes at least two PfSense routers, one as client, with the other as a server
OpenVPN Server Setup
- Client Export Package (Easily Generates User Config Files)
- On PfSense GUI Navigate to System/Package Manager/Available Packages and search for openvpn-client-export then install.
- Server Creation Wizard
- Navigate to VPN/OpenVPN/Wizards
- Select Local User Access
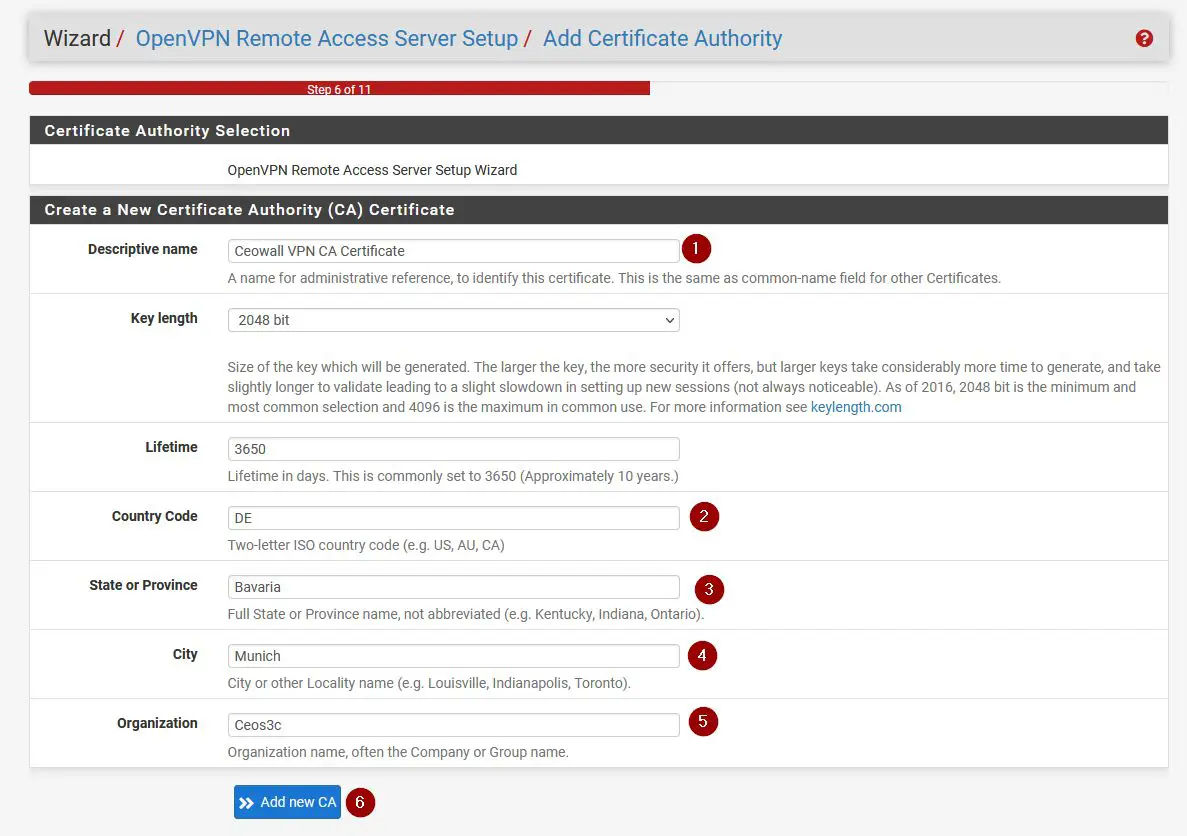
- Create a new CA
- Create a new Server Certificate
- General Server Information
Make certain the server’s listening port is not in use
- Cryptography Settings
- Tunnel Settings
The tunnel network address must not be in use, the local network will specify the LAN communication for VPN clients on this server
- Client and Advanced Settings
![Desktop View]()

 Make certain the server’s listening port is not in use
 The tunnel network address must not be in use, the local network will specify the LAN communication for VPN clients on this server

Adding a User to PfSense
In order to access the PfSense tunnel, creating a user with authentication information is necissary.
- Create a VPN User
- Navigate to System/User Manager and select +Add to begin the process of creating a new user
- Fill out a Username and Password and check Click to create a user certificate.
Exporting a Client
The previously installed client export package will be used to generate a file containing the necissary information for a client to connect to the server.
- Navigate to VPN/OpenVPN/Client Export
- Select Server and Client Connection Settings
![Desktop View]()
Choose the Inline Configurations/Most Clients option if connecting to a router or choose OS specific download for single user connections
PfSense Client Import
While PfSense has a package for exporting, the free version does not have an easy tool for importing client configurations.
- Creating User CA
- Navigate to /System/Certificate Manager/ CAs on the client PfSense router.
The Certificate Authority Data is in the file generated from the client-export package used on the server. Copy from
<ca>to</ca>.- Creating User Cert
- Navigate to /System/Certificate Manager/Certificates
The Certificate Data and Private key is found in the file generated from the client-export package. Copy the certificate data from
<cert> to </cert>and the private key from<key> to </key>.- Creating Client
- Navigate to VPN/OpenVPN/Clients and click on + Add
Change server address and server port - these are located in the client-export file if you don’t remember.
The username and password of the PfSense user created on the server
![Desktop View]()
Let the server handle the tunnel settings


 Choose the Inline Configurations/Most Clients option if connecting to a router or choose OS specific download for single user connections
 The Certificate Authority Data is in the file generated from the client-export package used on the server. Copy from
  The Certificate Data and Private key is found in the file generated from the client-export package. Copy the certificate data from
  Change server address and server port - these are located in the client-export file if you don’t remember.
  The username and password of the PfSense user created on the server
 Let the server handle the tunnel settings
Configuring Firewall for Admin/User Tunnels
- Add tunnel interface
- Navigate to Interfaces/Interface Assignments
- Add the interface with the network port
- Navigate to Firewall/NAT/Outbound
- Select manual outbound for the mode
- Add a new mapping
![Desktop View]()
- Navigate to Interfaces/Interface Assignments
